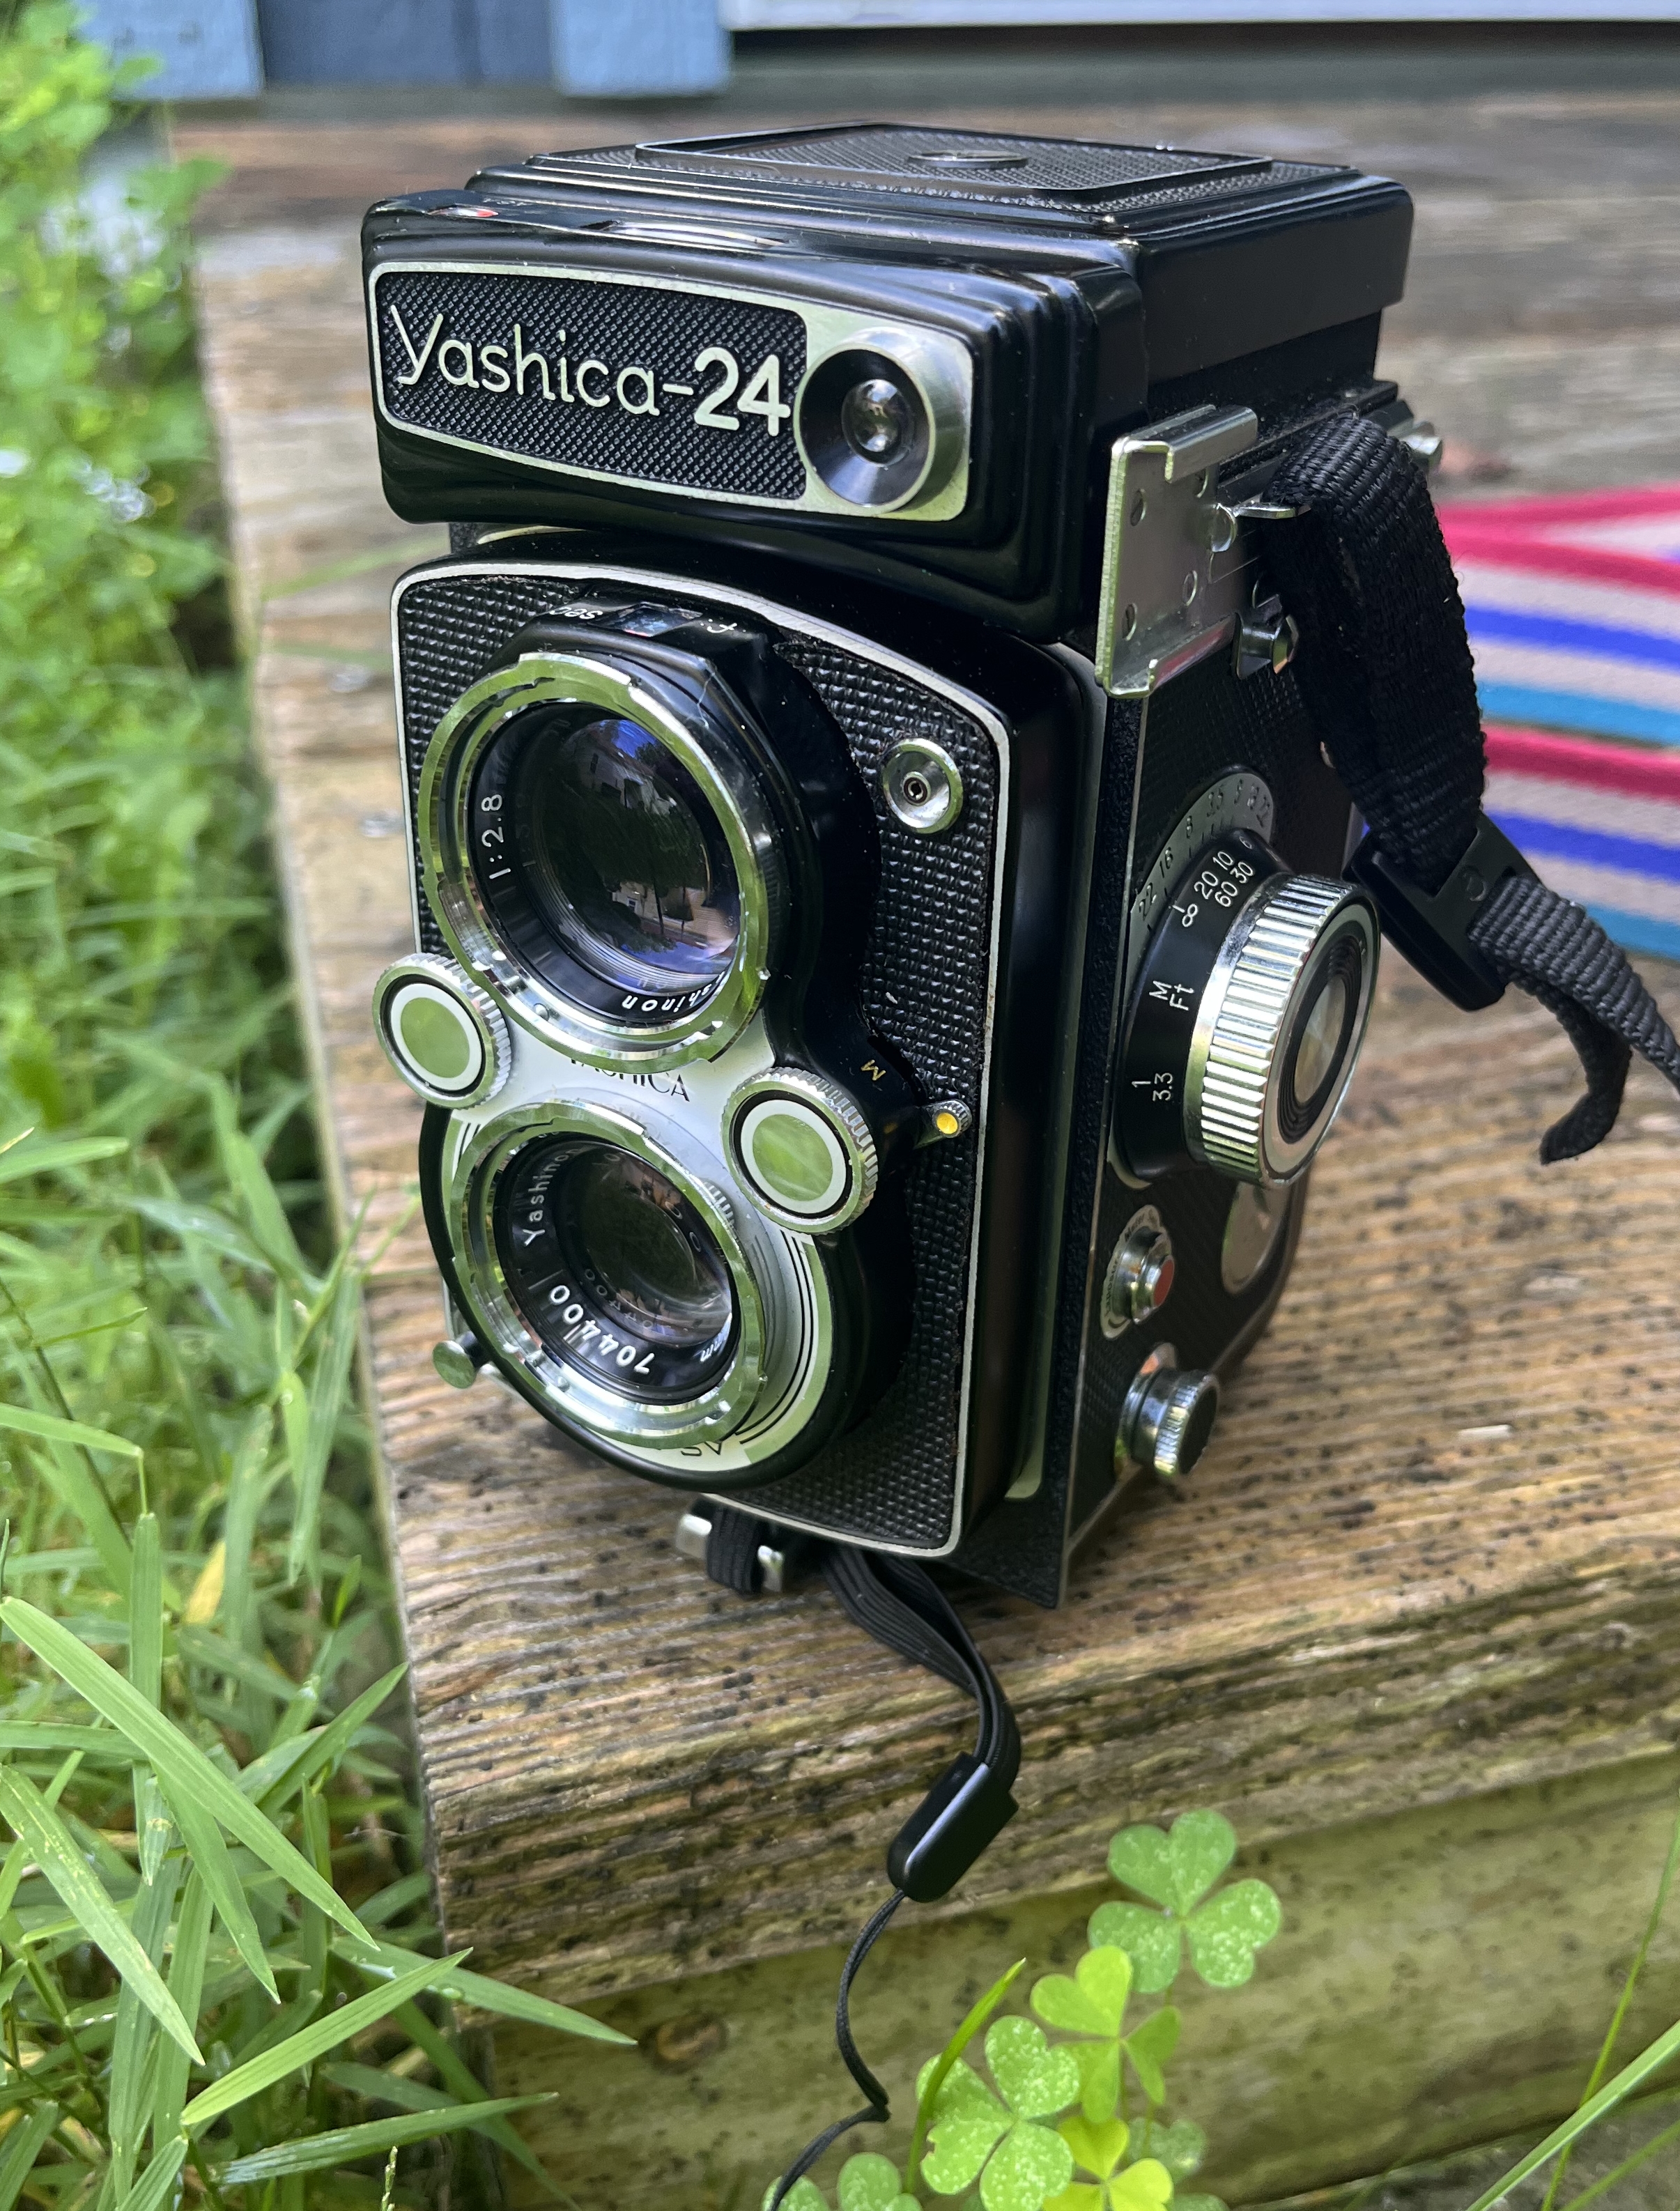
Picked up this GORGEOUS example of a Yashica 24 TLR. This is the first Yashica TLR with a (coupled) CdS meter released probably around 1965 (according to yashicatlr.com) and is the first in the series which includes the closely related Yashica-12, Yashica-Mat 124, and Yashica-Mat 124G cameras. This camera was designed and marketed to shoot 220 film, but despite much gnashing of teeth on the internet, I promise you it shoots 120 just fine with no special back or weird pressure plate modifications. In fact there’s a sticker in the film compartment to tell you where to start 120 film and apparently some were sold with a supplementary manual page the described the process of using 120 (see above yashicatlr page)
Mine showed up cosmetically gorgeous, meter worked fine with a battery (takes some old mercury battery of course, so either use an MR-9, Wein cell, or silver oxide + adjust the iso accordingly), but the shutter was totally stuck, apparently due to ancient oil having congealed on the blades. Furthermore, some bozo had tried to force the self timer lever and in doing so had broken it off. But after some repairs it seems to be working great (probably the shutter is a lil slow but oh well).
I jumped on this particular baby because not only was it a good deal, but the goes-up-to-24 film counter and presssure-plate-designed-for-film-with-no-backing-paper means that it’s a lot easier to shoot 35mm film through this camera (using some hacked-up spools as adapters). I mostly shoot 120 in this guy but it’s great to have the option and it’s fun to shoot sprockets
Vitals:
- Taking Lens: 80mm f/3.5-f/32 Yashinon
- Viewing Lens: 80mm f/2.8 Yashinon
- Copal SV Shutter w/ speeds 1 - 1/500 & B
- Crank advance with film counter that goes up to 24
- Coupled CdS light meter with ASA settings 50-400
- Finder is a matte screen with 4 grid lines and a separate fresnel under it, no central magnifier on the matte screen, but there is a pop-up magnifier in the hood for fine focus. I replaced the first-surface viewfinder mirror with a new one from ebay and am currently enjoying a very bright, clear viewfinder.
- Dimesions: 147mm * 105mm * 101mm (H * W * D)
- Self Timer (apparently these are often broken, the self time must only be set when the flash sync is set to x or can become jammed, there’s a little safety catch to prevent you from doing this but it is easily bent or jammed by old gummy lubricant)
- Flash Sync at all speeds, X or M
- Takes a leica-style internally threaded cable release (as in, the cable release has a big cap that goes over the shutter button). These are less common, but not too hard to find. There also exist adapters for normal style cable releases. Additionally, I’ve read that the threads are about the same as a standard schraeder valve used for inflating tires and bike tubes and that an adapter can be fairly easily fabricated out of a (prefereably metal) schraeder valve cap (haven’t tried this myself).
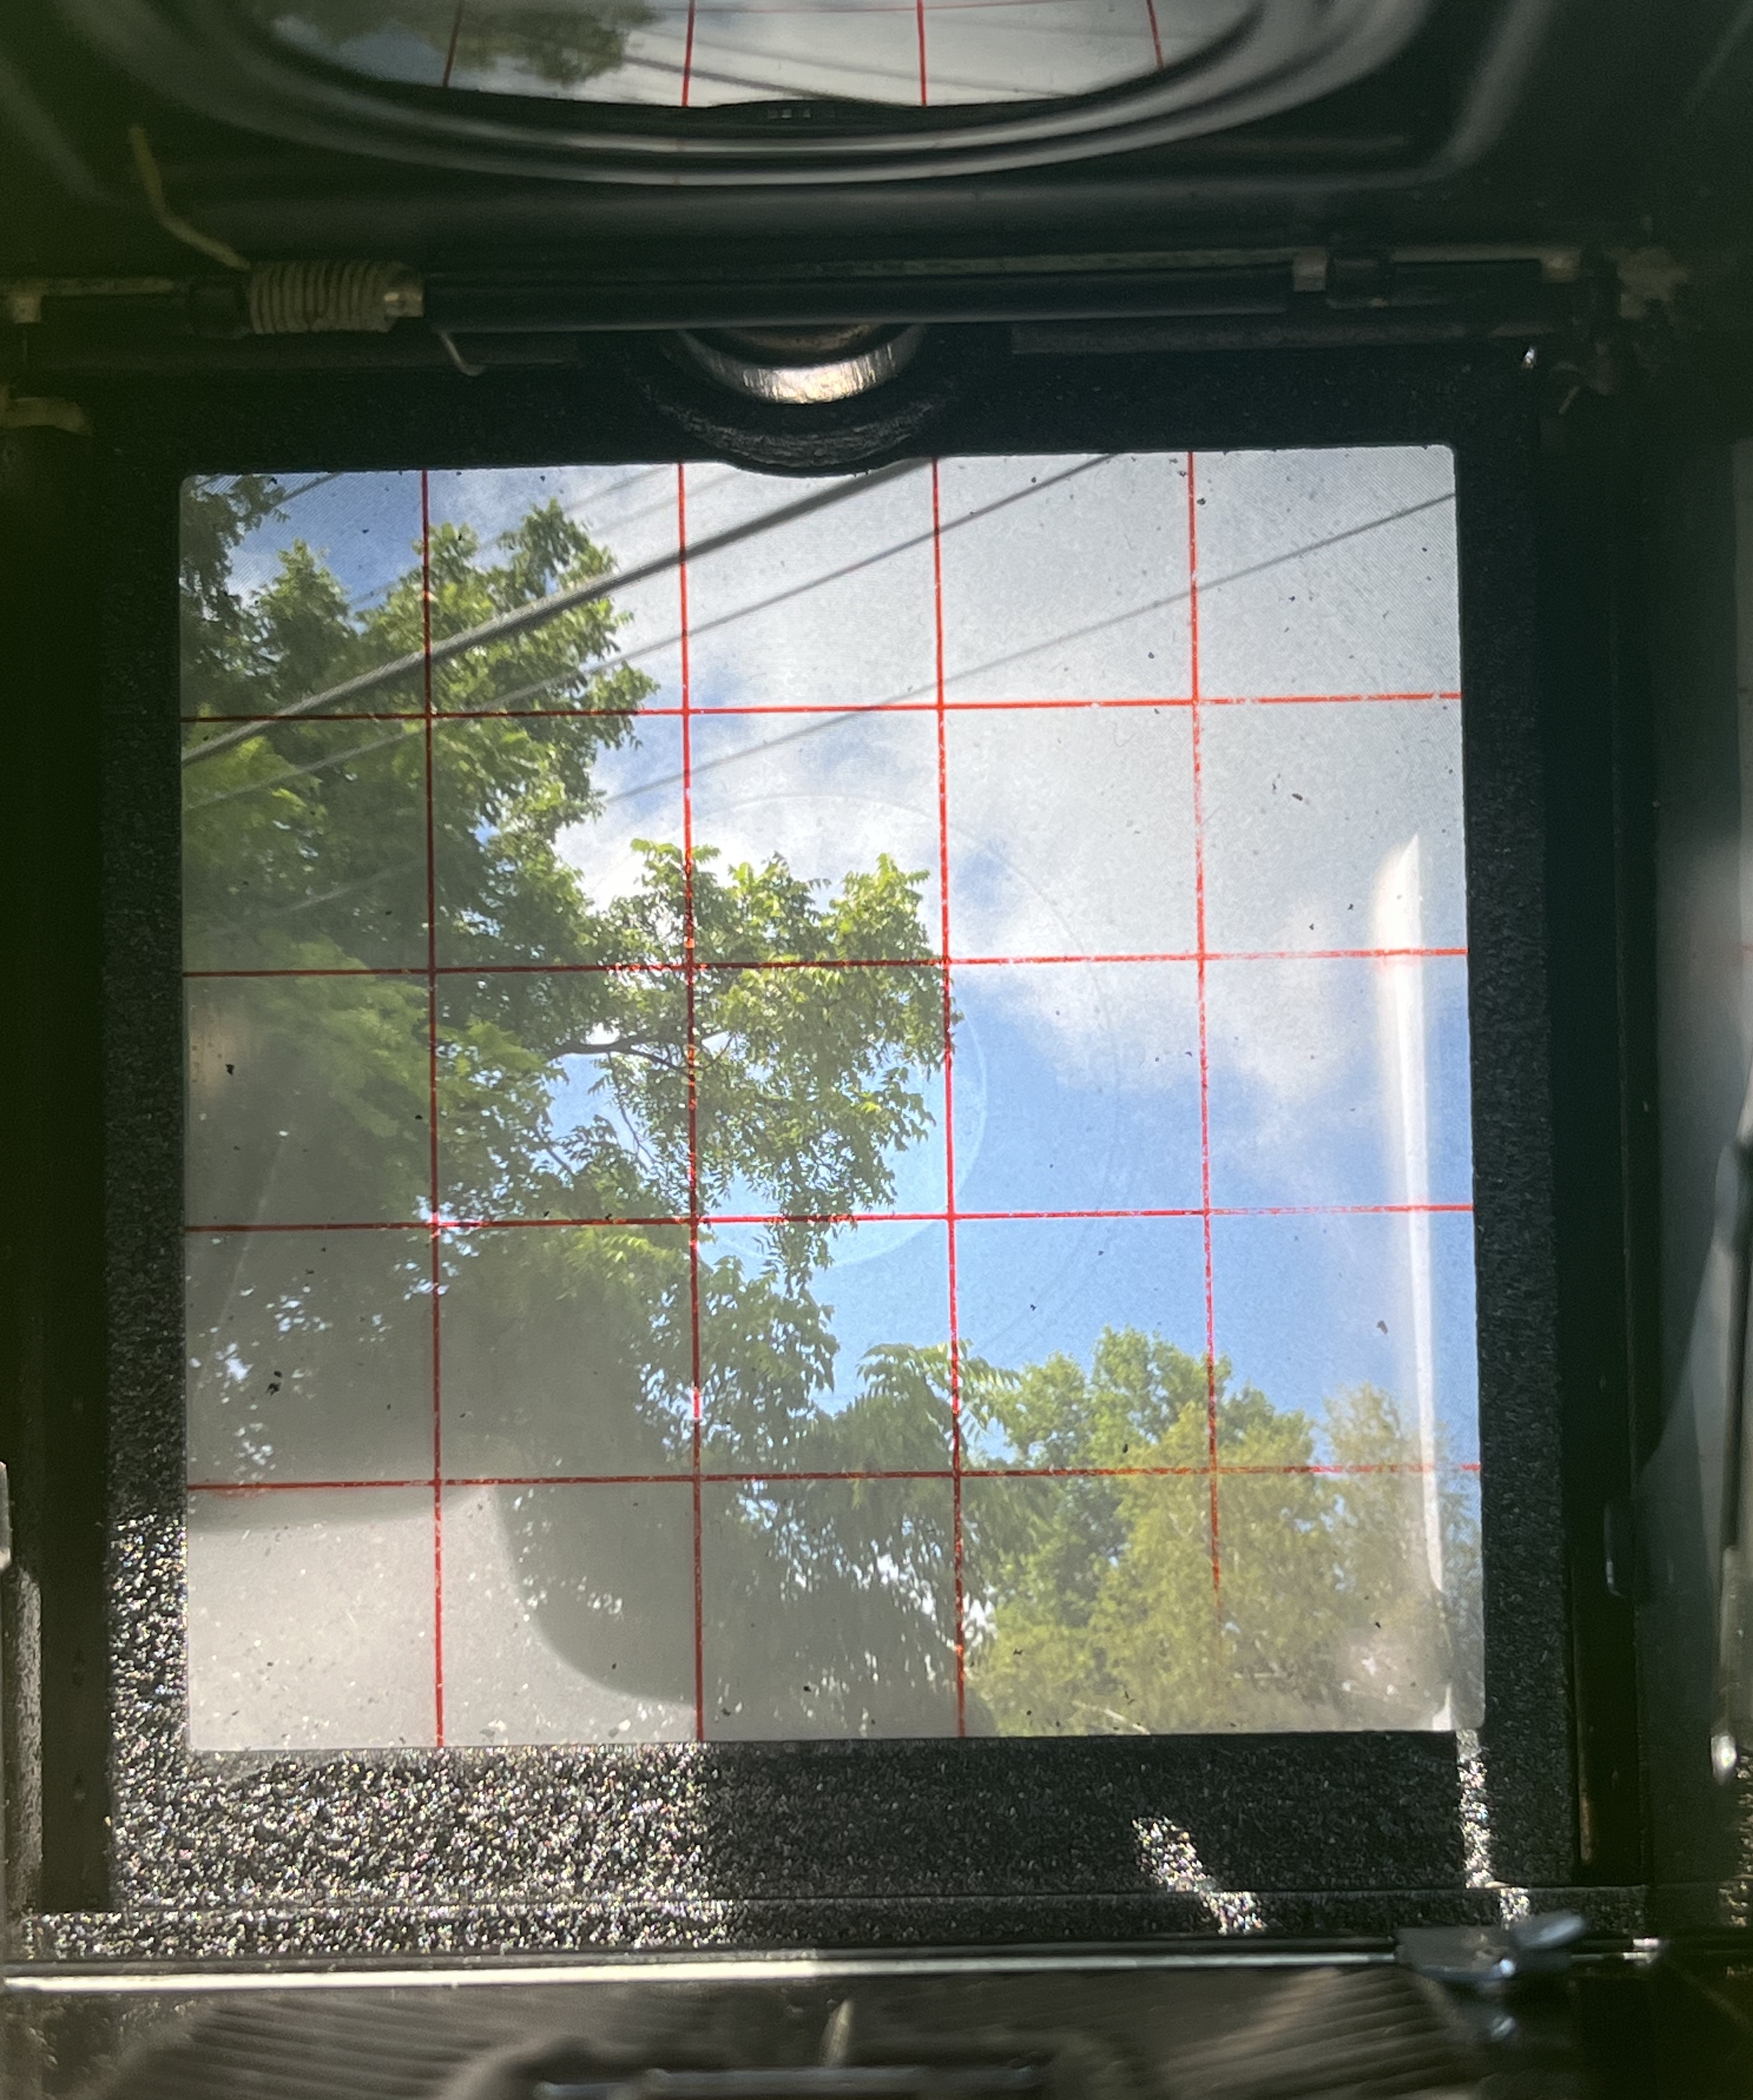
Viewfinder showing grid lines and circular fresnel pattern. There’s a disc in the center, but this is not a magnifier as in some other TLRs, rather there’s just no fresnel ridges in that area. When I took the finder off to replace the mirror, I also cleaned the fresnel an matte screen. Be careful cleaning the matte side of the screen, I almost wiped the red guidelines right off of the screen with my normal lens cleaner. I ended up gently dry wiping them and dusting with a rocket blower.
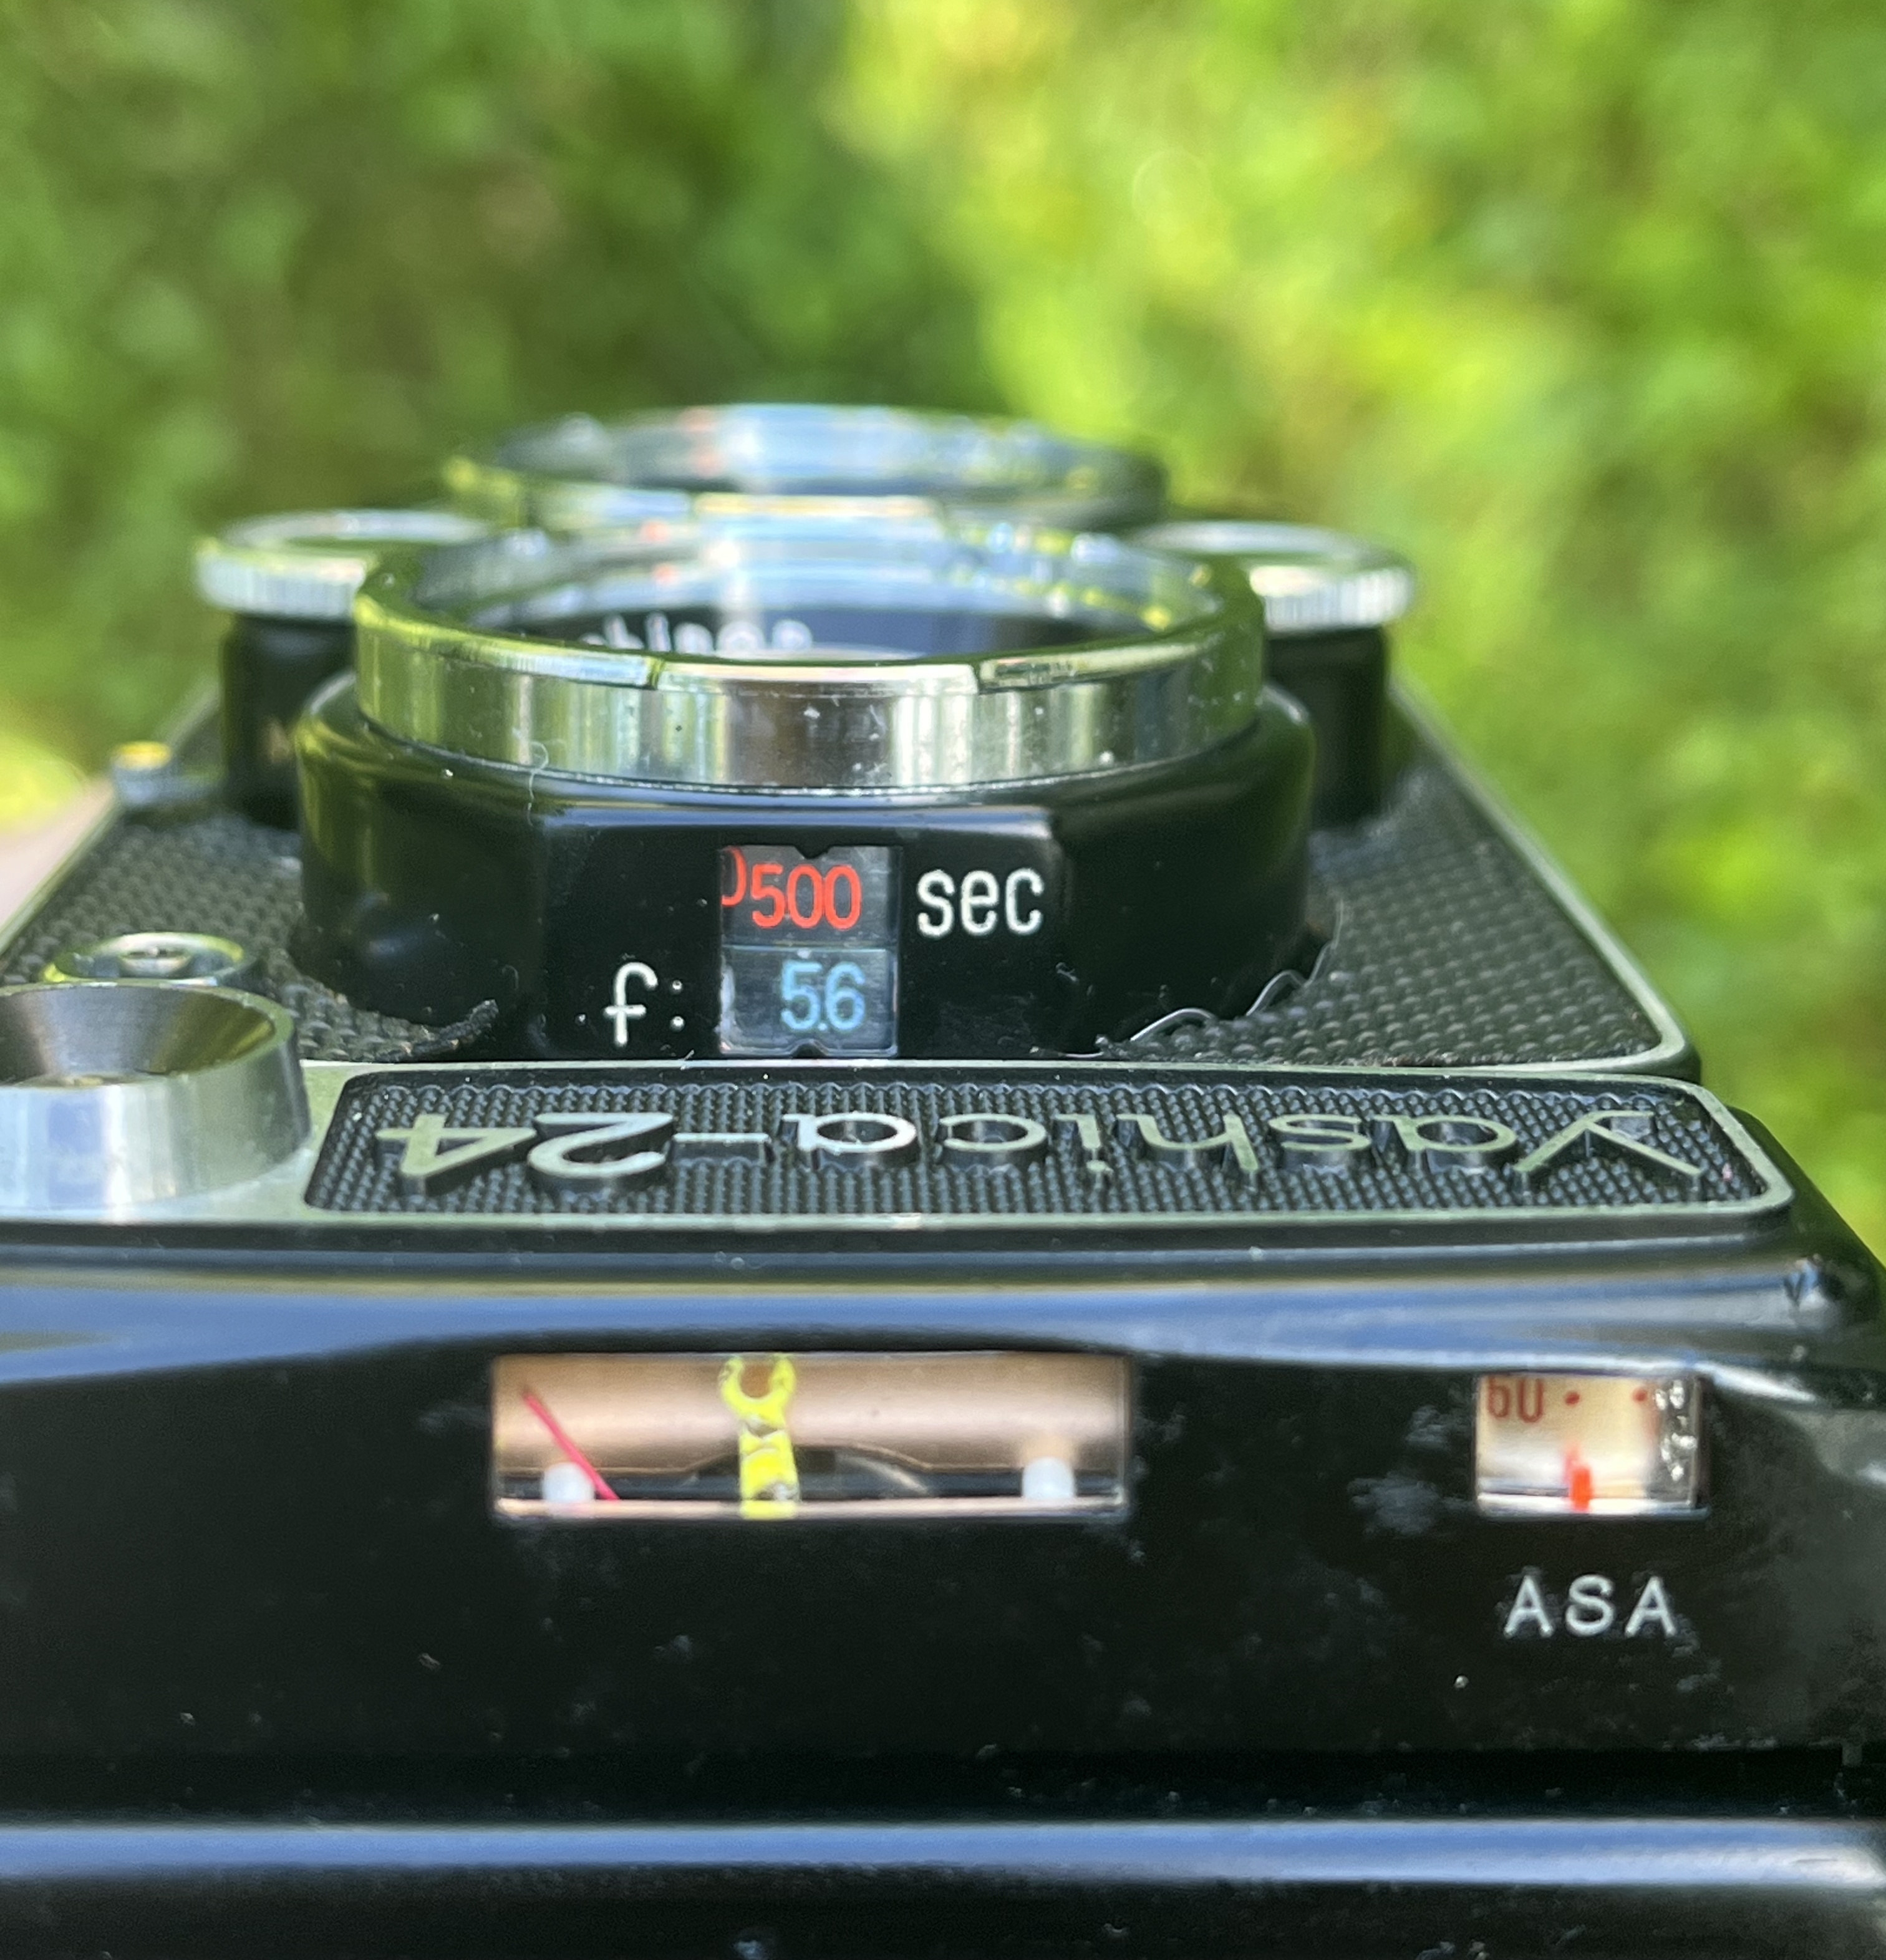
Control layout seen from the top of the camera. The yellow paint on my match needle is coming off a bit, but doesn’t affect useability. The plastic window for the apterture and shutter speeds on mine was badly fogged and yellowed. I replaced it with a small sheet of acetate from the craft store. I also repainted the numbers on the aperture ring from yellow to light blue. I found the yellow numbers hard to read and the blue is at least a little bit better. I wiped enamel onto the ring to fill into the engraved numbers then wiped the surface clean with a paper towel. The little plastic bubble windows covering the meter and ASA windows had come loose due to the ancient glue failing. I glued them back in place with some very tiny amounts of PU glue (I had a tube of liquid nails laying around).
Repairs
When I got this beauty, the shutter was totally seized. A little lighter fluid applied to the shutter blades got them to pop open, but as soon as the solvent evaporated, they’d seize up again. Additionally, the self timer was broken - it was stuck probably because someone tried to crank it with the flash sync set to M, they bent the safety catch and snapped off the timer lever. I completely disassembled the shutter, cleaned & lubed, and reassembled and she’s working great now! I think the shutter speeds are probably a bit slow but from what I’ve read that’s pretty typical on old leaf shutters and I’m not very worried about it, pictures have been coming out great so who cares, modern film can handle a little overexposure very well.
Repair Links
- Yashica D Copal MXV shutter repair - not identical, but very similar and a helpful guide. Describes removing the self timer which I did. Broken self timers can simply be removed, the shutter mechanism does not depend on them (mostly, the detent spring on the shutter speed ring is attached to the self timer, but you don’t really need that).
- Nice pics of yashica tlr internals, and direct comparisons between yashica-mat and 124 internals
- Yashica 124 meter circuit and calibration The meter circuit on my yashica-24 appears to be a little different that what’s pictured here, so YMMV. I did not bother to calibrate the meter as it seems reasonably accurate.
- Some diagrams for basic disassembly of the front cover and lens holder also covers some other common TLRs.
- learncamerarepair.com service manuals You have to pay for them, but they’re worth it. Several helpful guides. The Yashicamat 124 CLA tutorial is similar to the Copal MXV shutter repair link above but much more detailed. The Copal SVE shutter guide is helpful too, but probably not necessary with the CLA guide. There’s a nice exploded diagram for the 124G as well that’s not going to be identical for the yashica-24, but lots of stuff is pretty similar.
Anywho, here’s some repair pics for you!
Video showing the sticky shutter action. With a lil lighter fluid it opens up, so we know the shutter mechanism is basically functional, just gummed up.
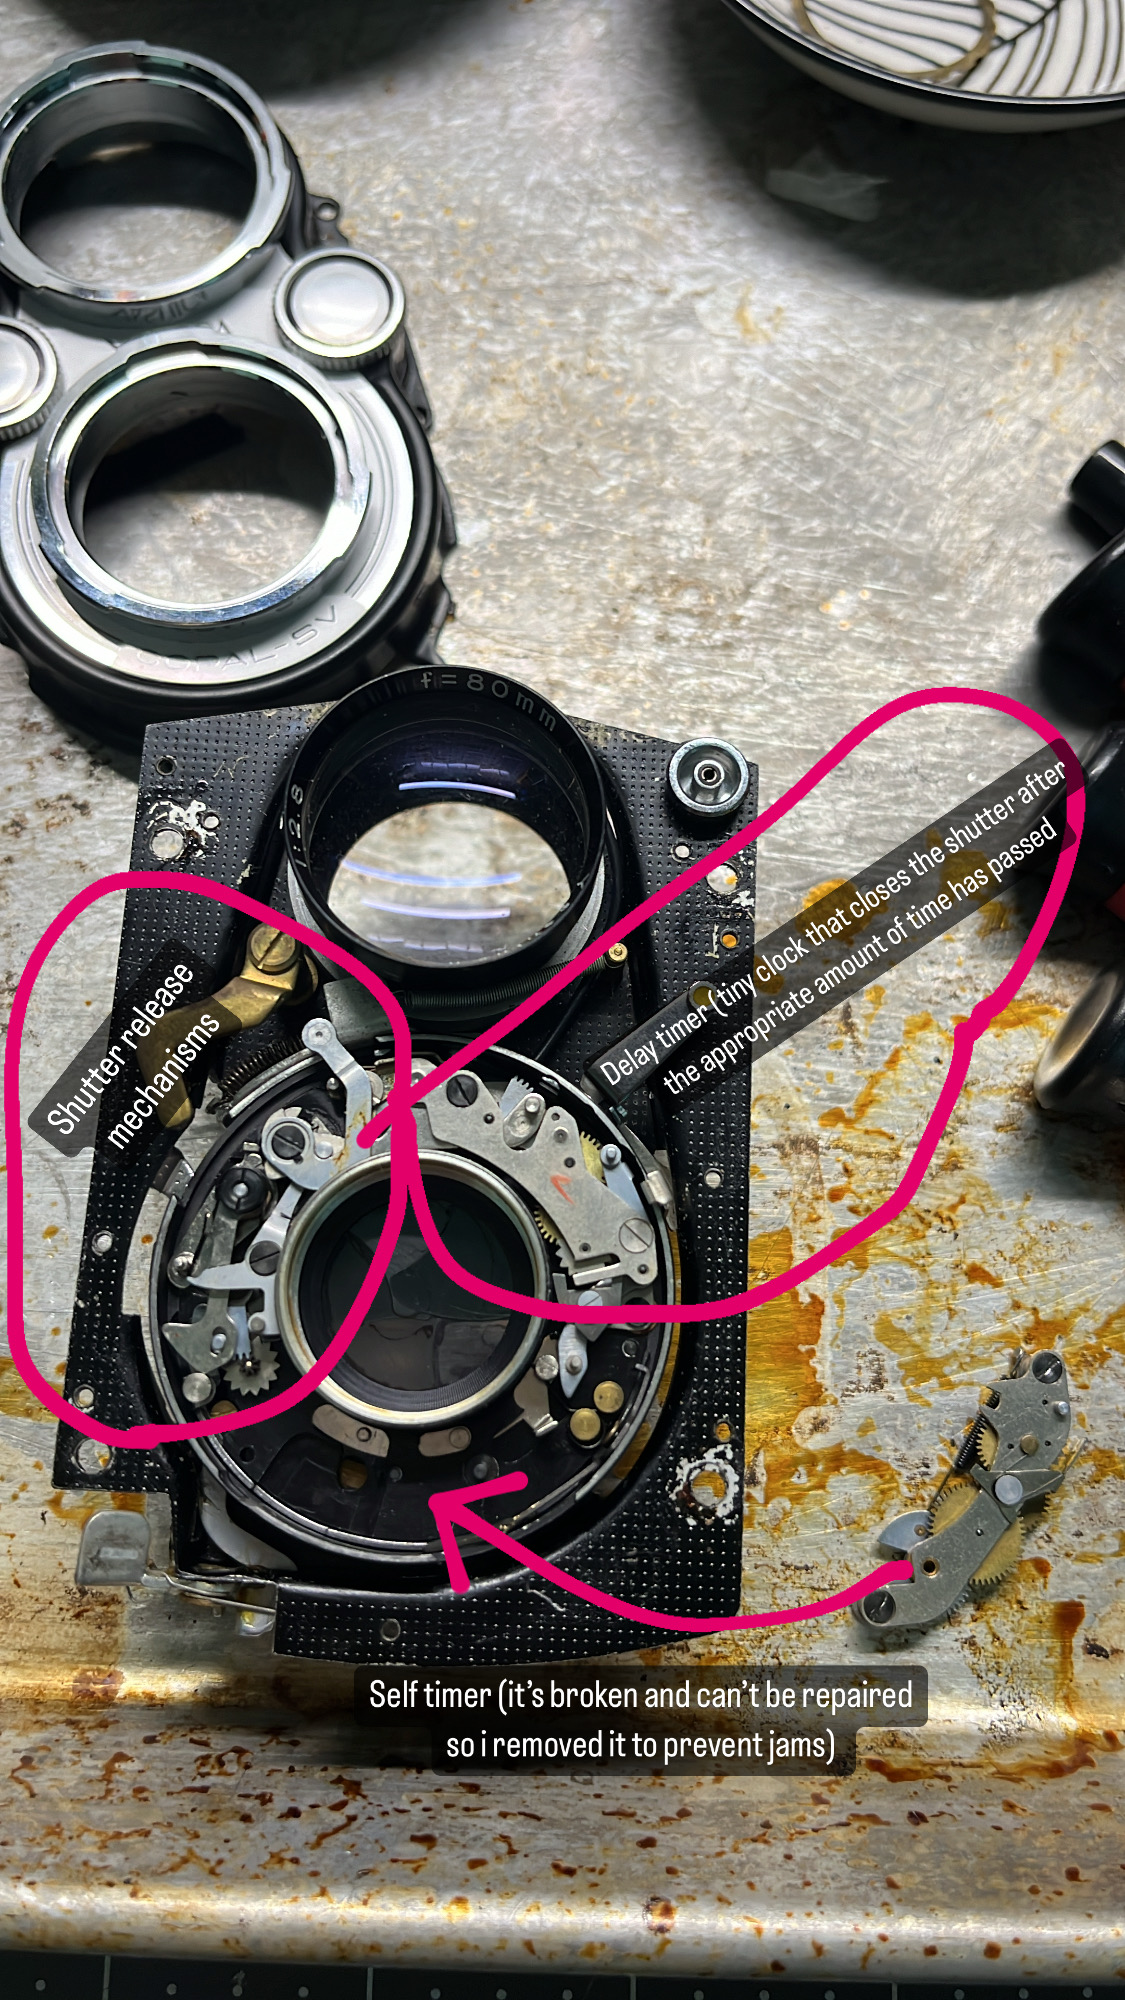
The shutter mechanism opened up with the general parts labeled. The self timer has been removed in this pic. I did not re-install the self timer cus it’s broken and not repairable (the cocking arm is snapped off).
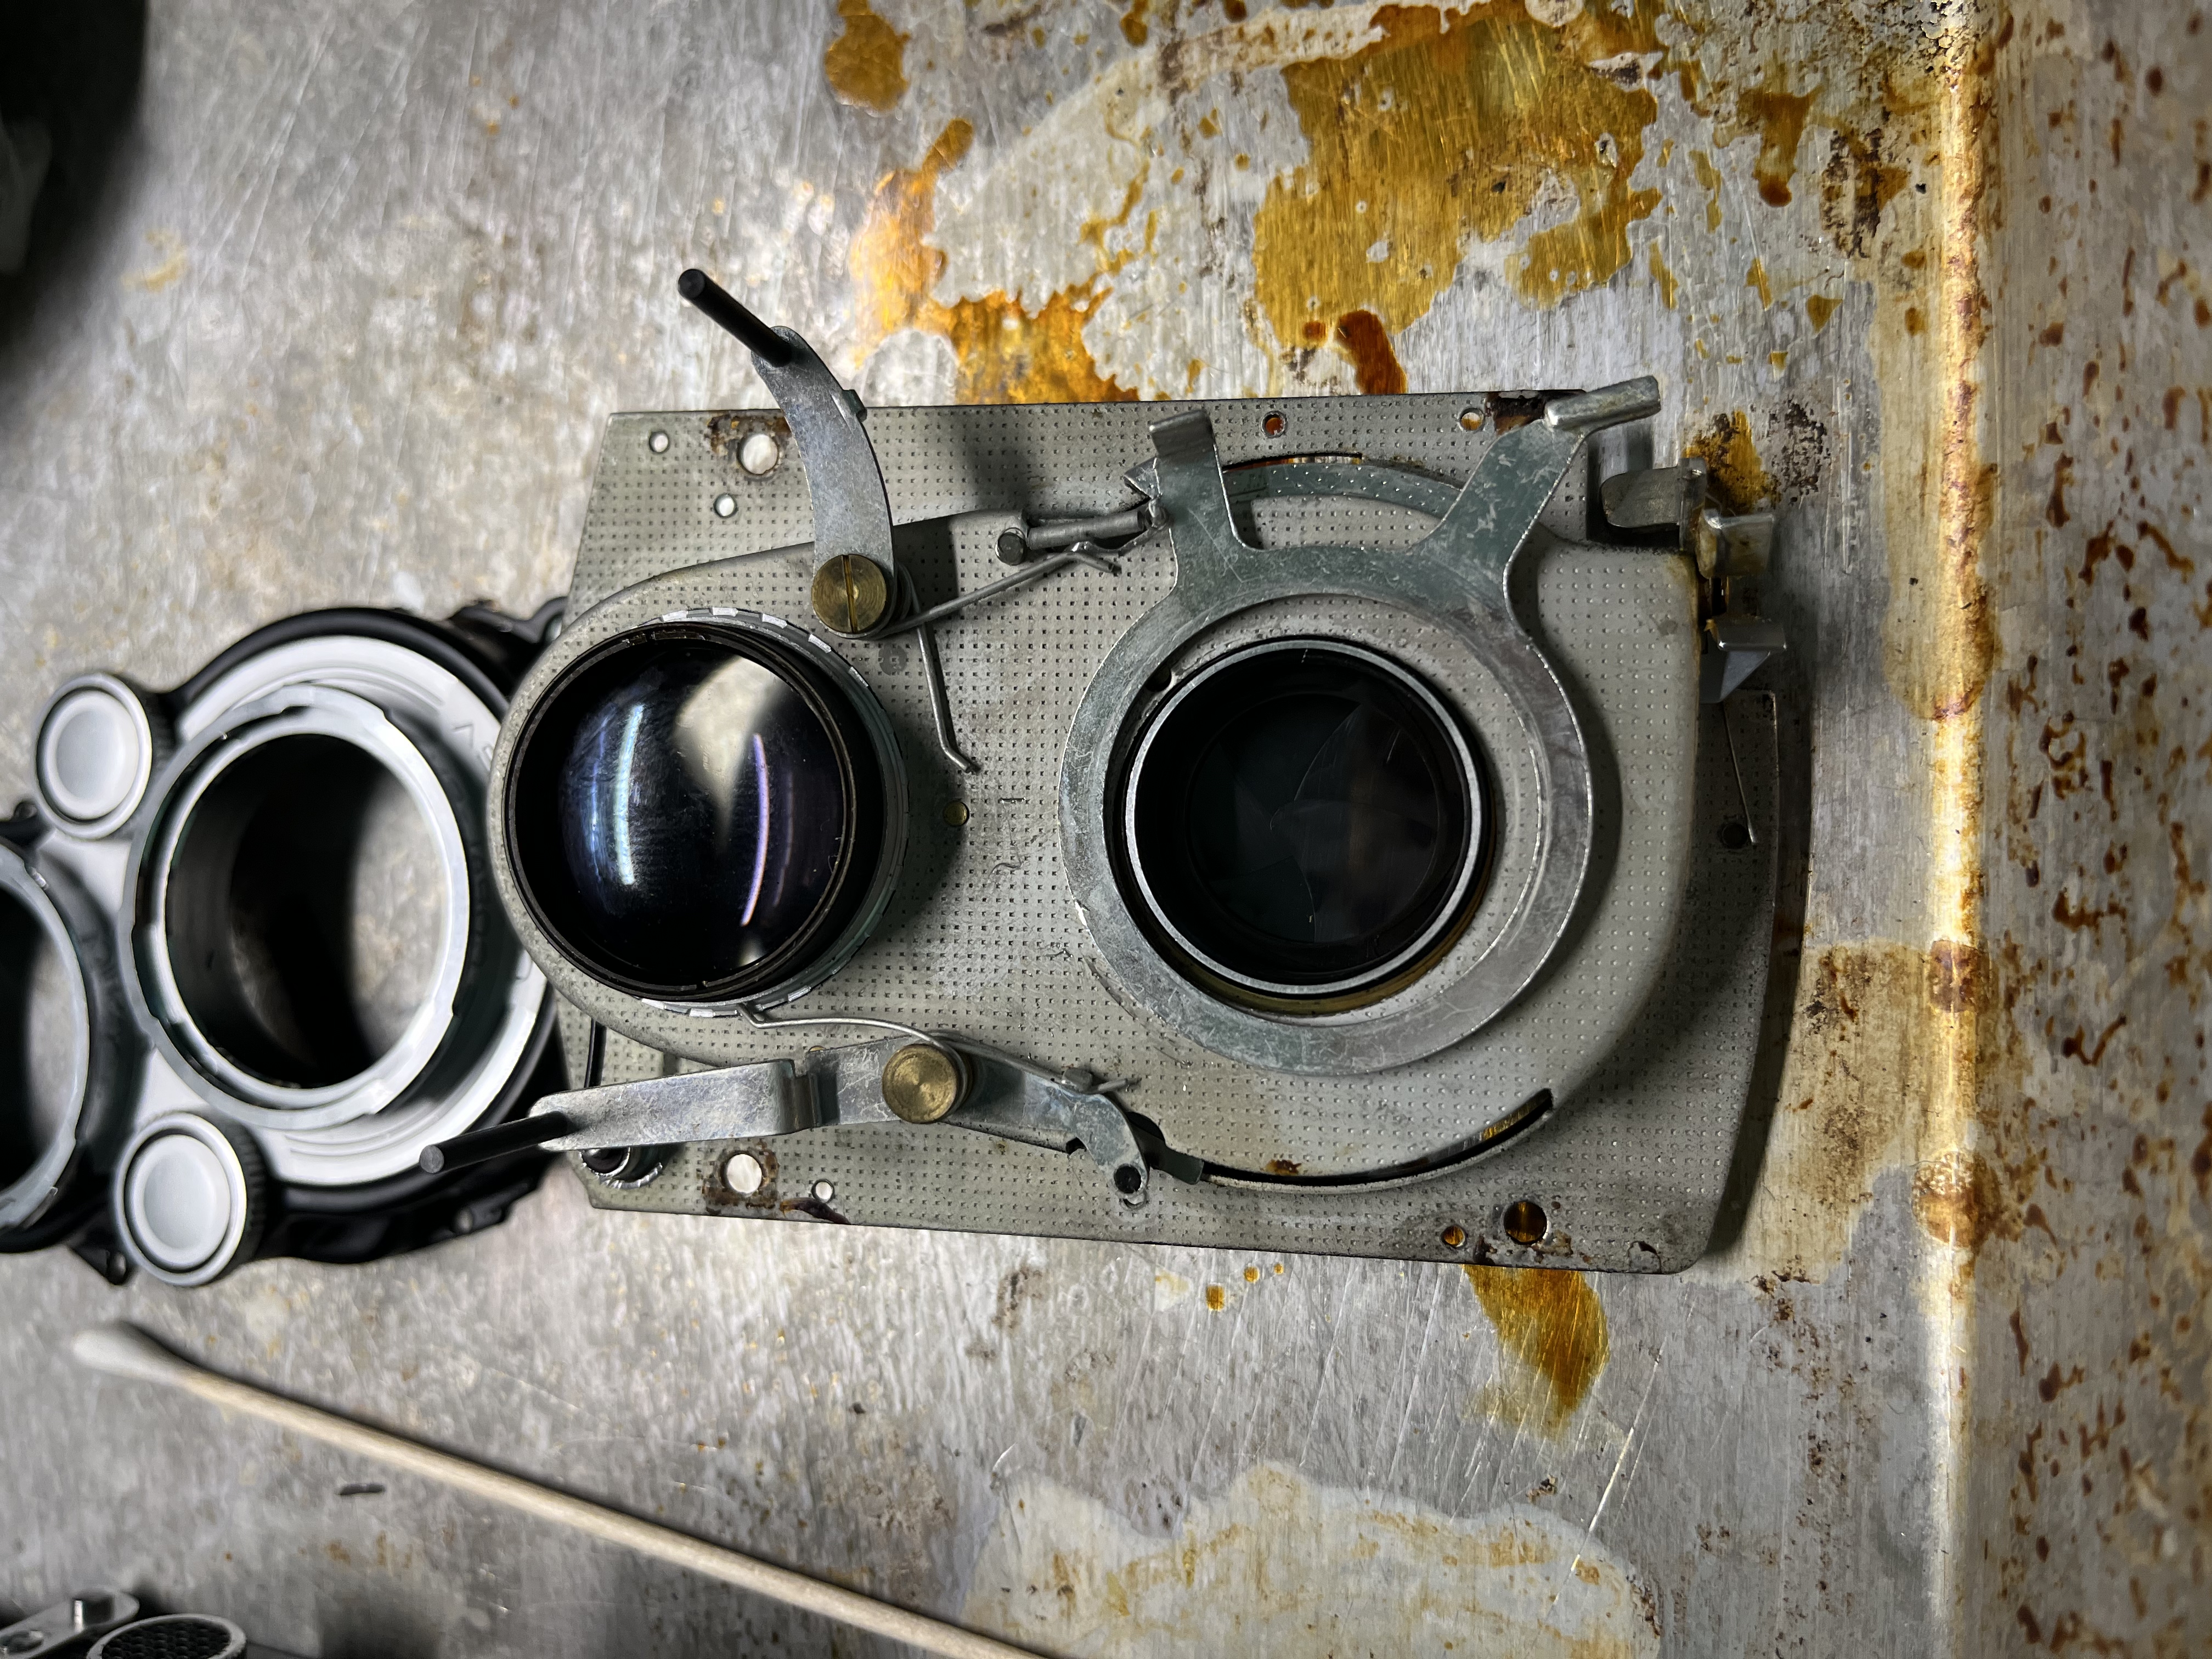
Backside of the lens board with the rear element of the taking lens (bottom) removed. Note the two arms on either side of the viewing lens, those couple the aperture and shutter settings to the light meter. The ring with two protrusions unlocks the winding mechanism when the shutter is released.
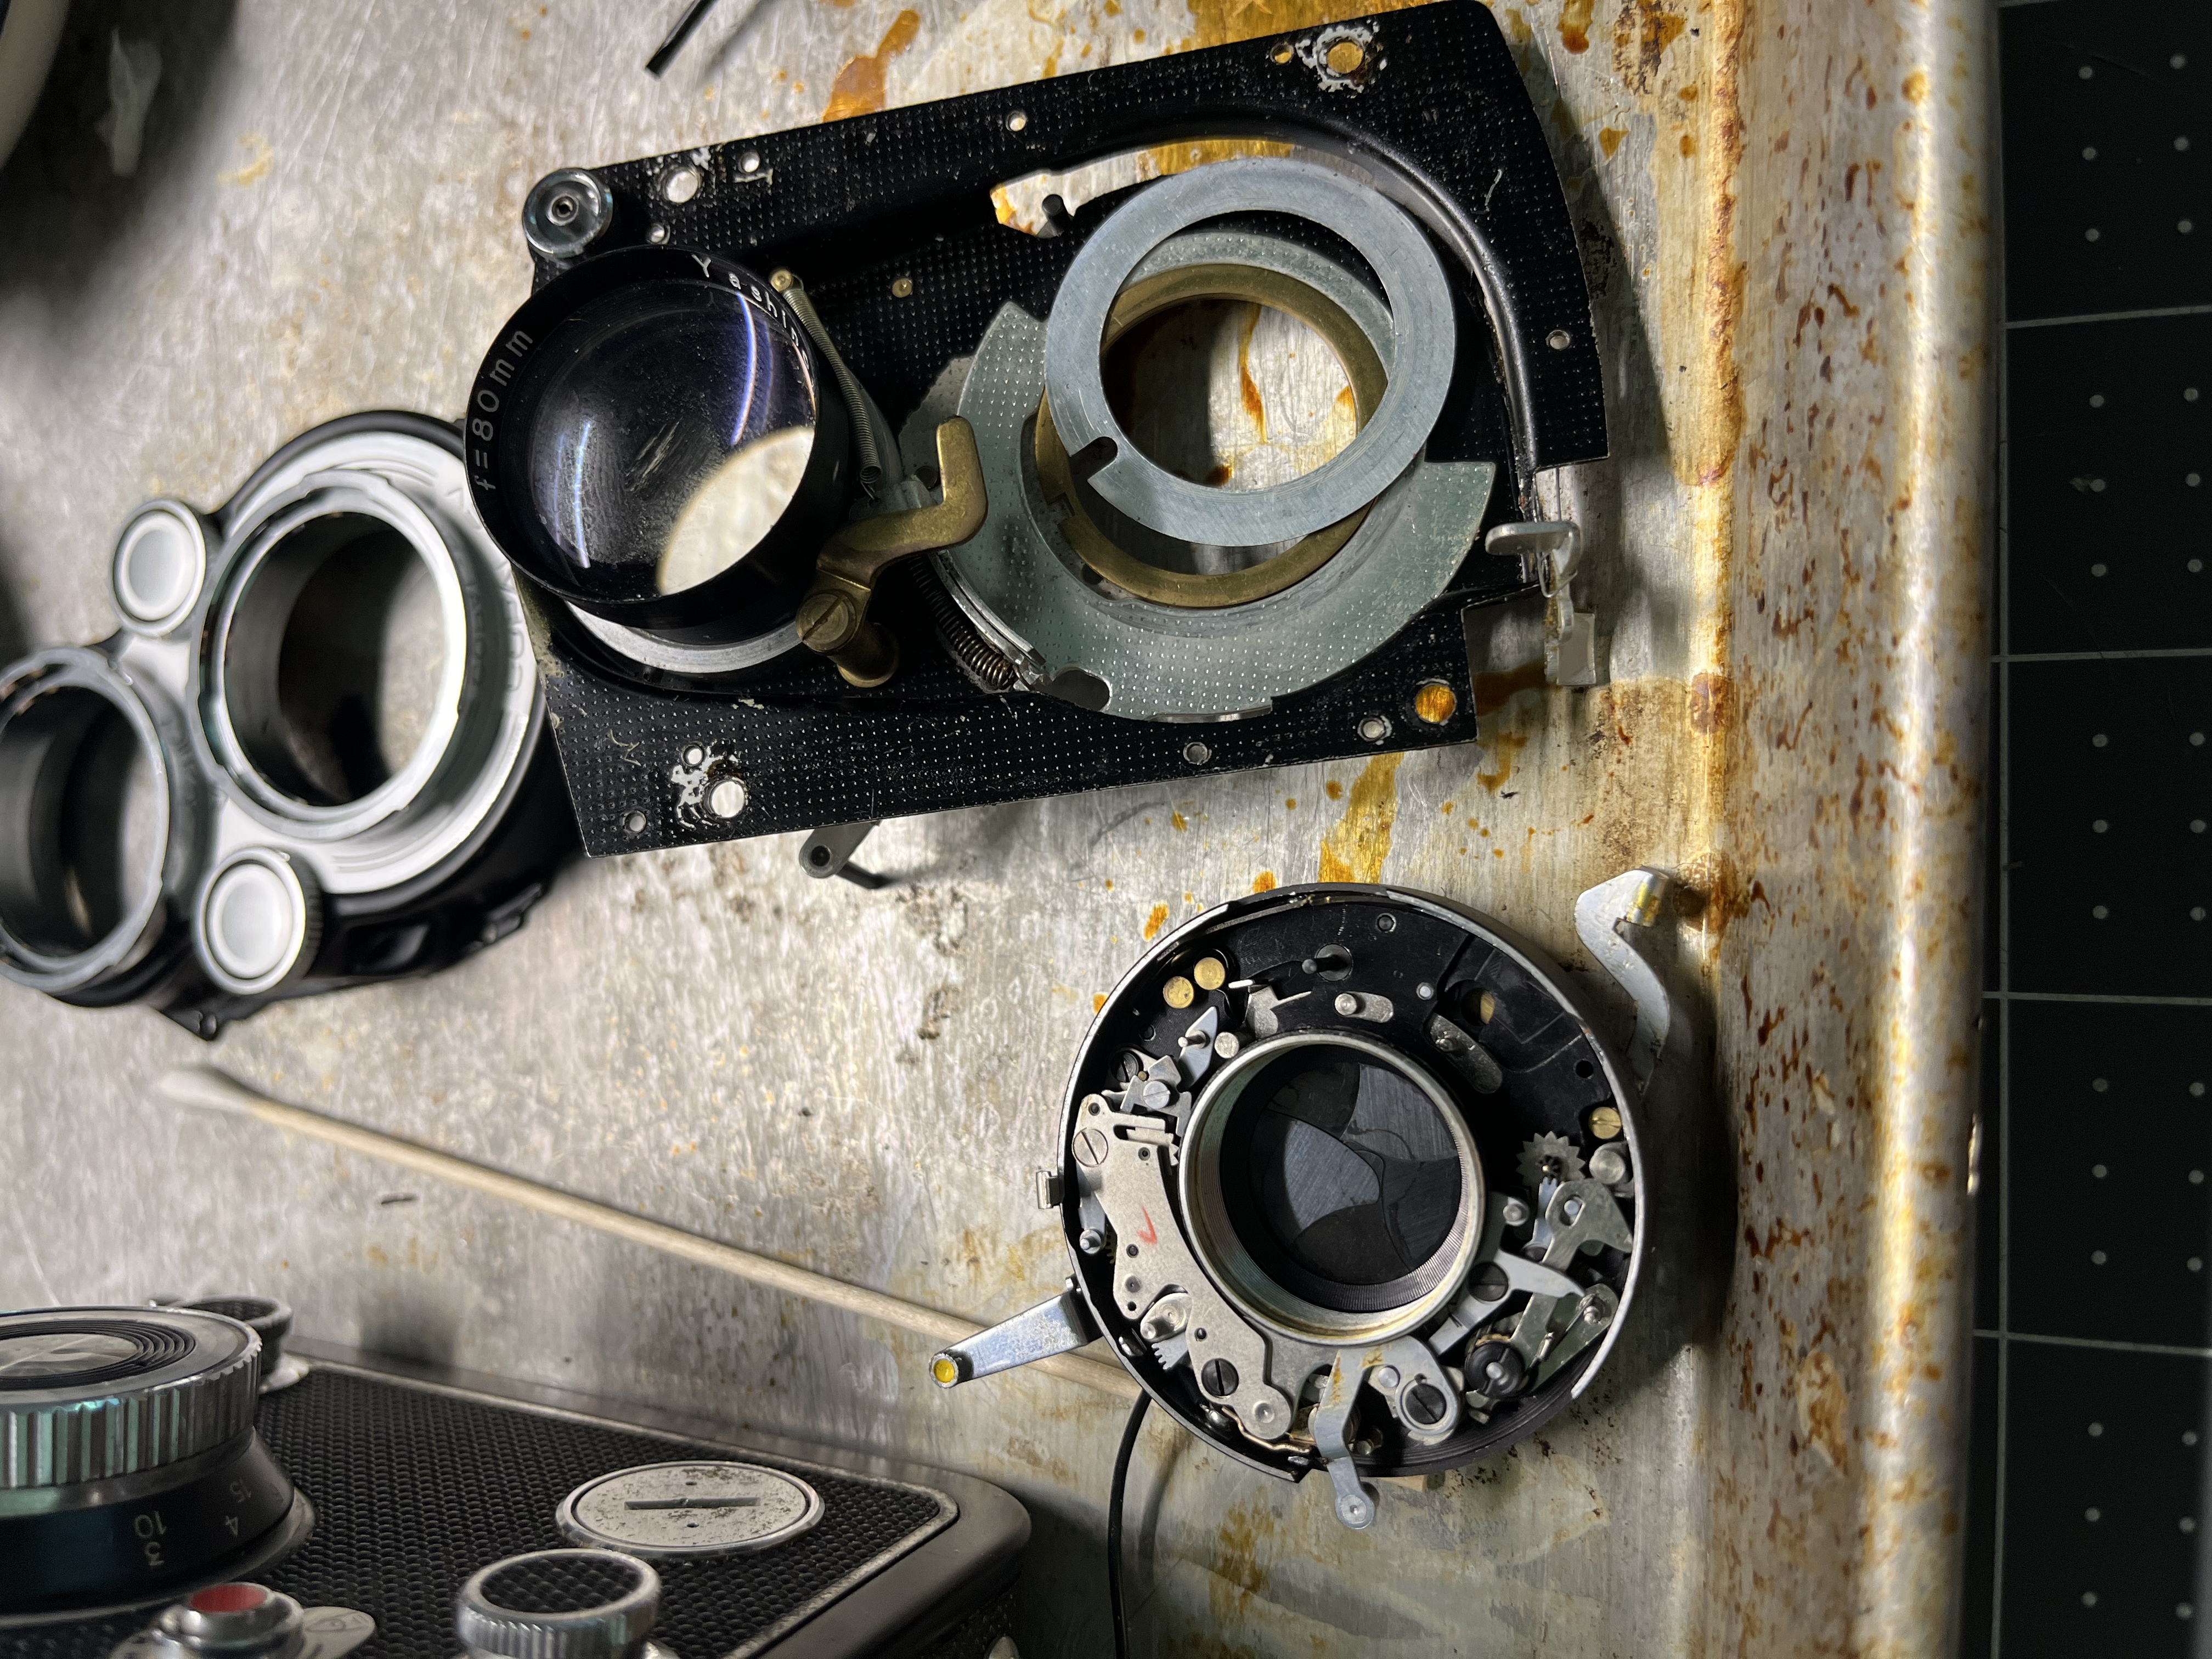
Shutter mechanism has been removed from the lensboard after unscrewing the baffle on the back of the lens board (not pictured). I don’t think you have to remove the rear element to take the shutter out but if you’re doing any work on the shutter you’ll probably want to anyways because it’s easy and it’s a good time to clean everything.
Video of the diaphragm action viewed from the rear of the shutter. You really don’t need to take the diaphragm apart to fix a sticky shutter, but I did because I accidentally removed the screws that hold it together and the blades got all wombly (whoops). Good opportunity to clean it I guess. It’s not hard to reassemble, but it’s very fiddly and took me several attempts, I used tweezers.
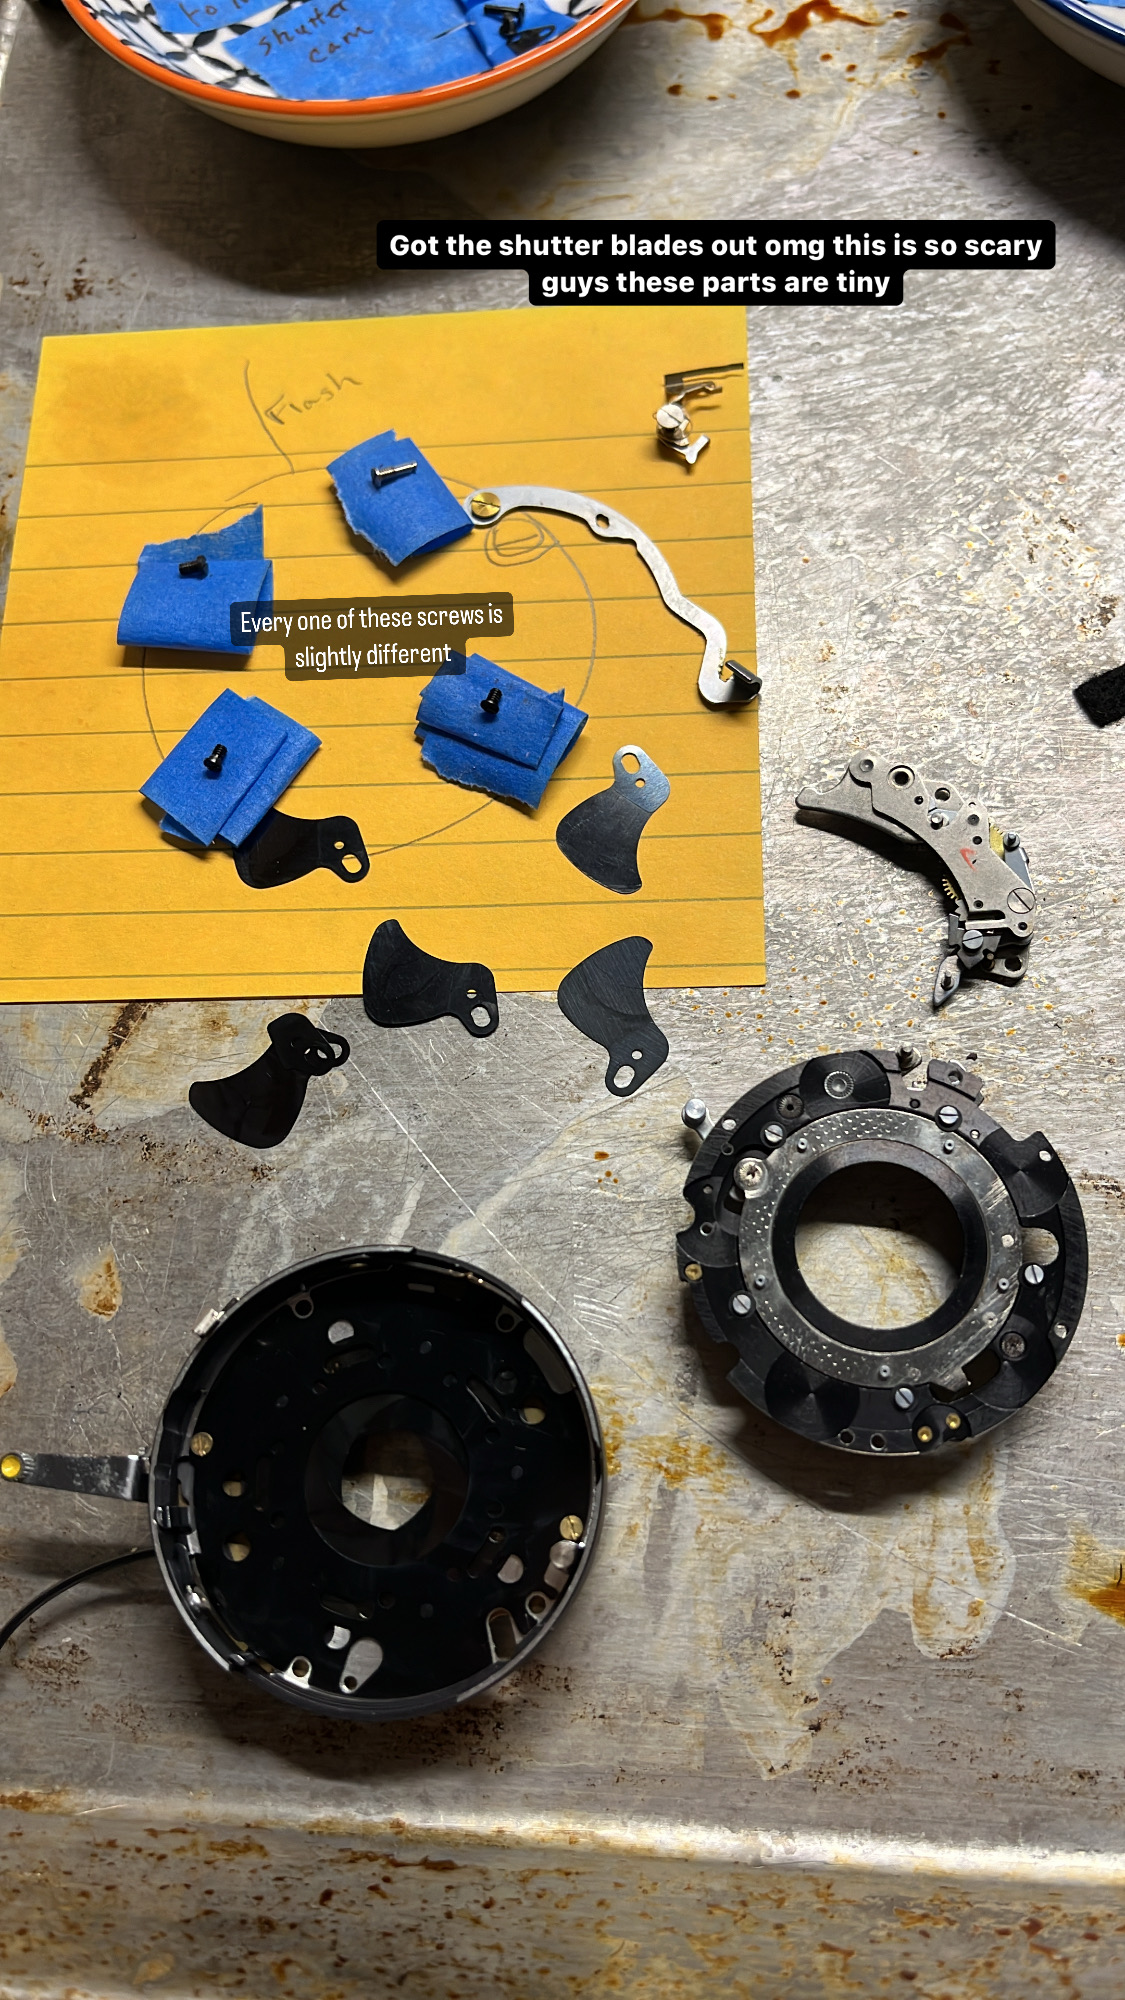
The shutter mechanism removed from it’s housing, this releases the shutter blades and their spacers. All the shutter blades and spacers are identical so you don’t need to keep track of them, but each screw is different so take care to note which screw goes where.
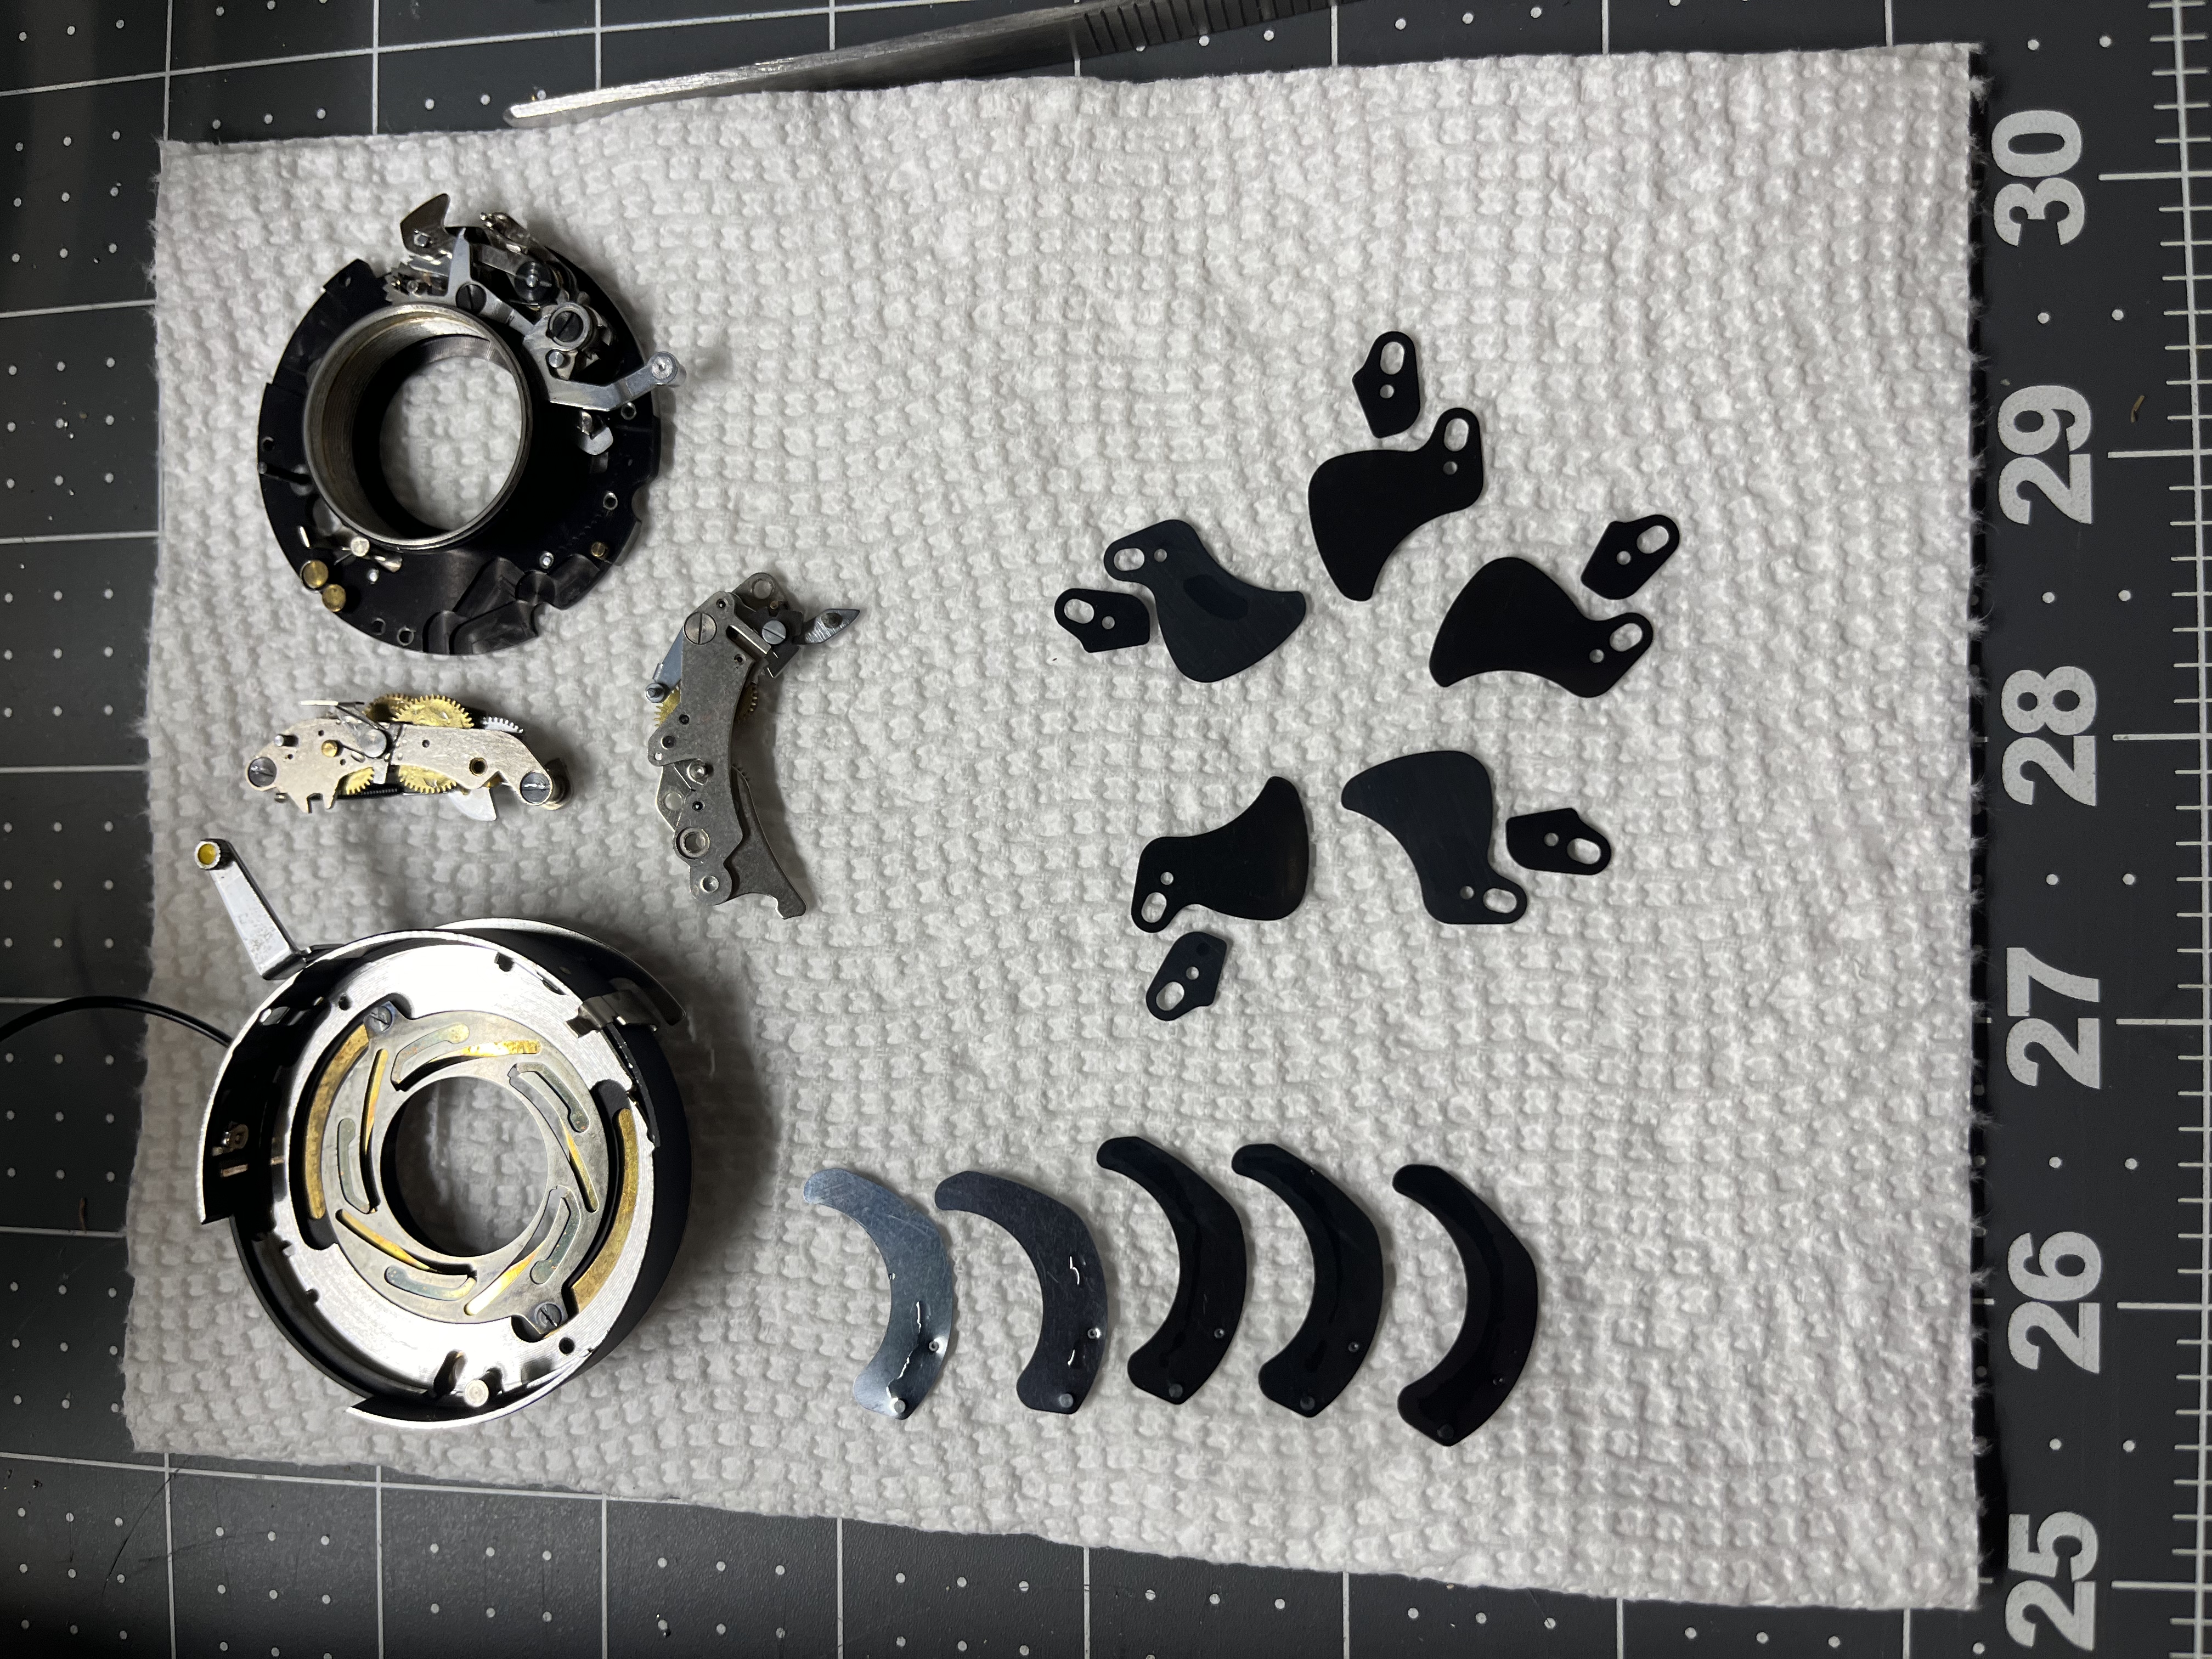
All the parts layed out after going through an ultrasonic denture cleaner. I made my own cleaning solution, I didn’t measure carefully but it was probably 1 part simple green (an all purpose concentrated cleaner generally intended to be mixed into spray bottles), 1 part ammonia, 8 parts water. It was getting late in the night and I was in a hurry, but if I did it again I’d probably let things soak for a while and run the cleaning cycle on the ultrasonic cleaner for longer to try and get any and all gunk out of the tiny crevices in the gear trains. Nonetheless it did a great job cleaning the diaphragm and shutter blades. DO NOT touch the blades after washing them, your finger greases can gunk them up and promote rust. I did all handling of blades with tweezers after the wash, wearing gloves or finger cons would be wise too.
After washing, I swished all the parts in distilled water to clean off the soap and ammonia, then dipped them in pure alcohol so that they’d dry quickly (in case any of the parts were steel and might rust, also so I didn’t have to wait so long to lube and re-assemble)
OK I didn’t take any pics of reassembling the shutter blades because it was too late and I was completely infected with the camera madness, but LOOK AT THAT SMOOTH ACTION. The Copal MXV repair guide linked above has a great description of re-assembling the shutter blades. Basically, put in the first blade with no shim, but all the other blades on top of a shim, put the remaining shim on top of the first blade. I placed the blades in the order pictured in that guide (i.e. starting with the blade in the same position), but I really don’t think it matters where you place the first blade as long as you do the shims correctly and place each blade on top of the last.
The guide suggests practicing re-inserting the shutter mechanism into the housing BEFORE you place all the blades, and I strongly second this advice. DON’T cock and release the shutter until you’ve put all the screws back in (the blades will get scrambled and maybe damaged)!
